Protect My Env
<p align="center">
<img src="https://raw.githubusercontent.com/marcuspmd/protect-my-env/master/icon.png" alt="Protect My Env Icon" width="128" />
</p>
<p align="center">
<strong>Keep your .env secrets hidden on screen — without compromising your workflow.</strong>
</p>
<p align="center">
<a href="https://marketplace.visualstudio.com/items?itemName=marcusp.protect-my-env">
<img src="https://img.shields.io/visual-studio-marketplace/v/marcusp.protect-my-env?label=VS%20Code%20Marketplace&color=blue" alt="Marketplace Version" />
</a>
<a href="https://marketplace.visualstudio.com/items?itemName=marcusp.protect-my-env">
<img src="https://img.shields.io/visual-studio-marketplace/d/marcusp.protect-my-env?color=green" alt="Downloads" />
</a>
<a href="./LICENSE">
<img src="https://img.shields.io/badge/license-MIT-brightgreen" alt="MIT License" />
</a>
</p>
<p align="center">
<a href="https://github.com/marcuspmd/protect-my-env/actions/workflows/ci.yml">
<img src="https://github.com/marcuspmd/protect-my-env/actions/workflows/ci.yml/badge.svg" alt="CI" />
</a>
<a href="https://github.com/marcuspmd/protect-my-env/actions/workflows/codeql.yml">
<img src="https://github.com/marcuspmd/protect-my-env/actions/workflows/codeql.yml/badge.svg" alt="CodeQL" />
</a>
<a href="https://scorecard.dev/viewer/?uri=github.com/marcuspmd/protect-my-env">
<img src="https://api.securityscorecards.dev/projects/github.com/marcuspmd/protect-my-env/badge" alt="OpenSSF Scorecard" />
</a>
<a href="https://codecov.io/gh/marcuspmd/protect-my-env">
<img src="https://codecov.io/gh/marcuspmd/protect-my-env/graph/badge.svg" alt="Coverage" />
</a>
</p>
🔐 Privacy & Security
Your secrets never leave your machine.
- ✅ Zero data collection — no environment variables, keys, or values are ever recorded, stored, or transmitted anywhere.
- ✅ No remote calls — the extension works entirely offline, with no telemetry, no analytics, and no external servers.
- ✅ Total privacy — everything happens locally inside your VS Code editor.
⚠️ Disclaimer: This extension does not protect your .env files from AI agents (such as GitHub Copilot, Cursor, or similar tools) that have direct access to your workspace files. We do not encrypt or obfuscate file contents on disk — the data remains readable by any process with file system access. Protect My Env is designed solely to prevent accidental exposure during screen sharing, recordings, live coding sessions, and pair programming. It is not a security tool for AI context isolation.
Why Protect My Env?
Every time you open a .env file in VS Code, your secrets are visible in plain text — in editor tabs, during screen shares, in recordings, and in pair-programming sessions. Protect My Env solves this by rendering secrets as masked characters from the very first frame, with zero workflow disruption.
Features
| Feature |
Description |
| 🔒 Secure Editor |
.env files open masked by default — no plaintext flash |
| 👁️ Per-key Reveal |
Reveal or hide individual values with a single click via CodeLens |
| 🌐 Reveal All / Hide All |
Toolbar buttons to toggle all values at once |
| 🔍 Search & Sort |
Filter by key or comment; sort by key column without touching file order |
| 🎭 Two Masking Modes |
all masks every key; pattern masks only keys matching glob patterns |
| 💬 Comment Protection |
Optionally mask full-line and inline comments too |
| ✏️ Inline Editing |
Edit values directly in the secure view |
| 📝 Open as Text |
Fall back to the standard VS Code editor any time |
Preview
Installation
From the Marketplace
- Open VS Code.
- Press
Ctrl+Shift+X (or Cmd+Shift+X on macOS) to open the Extensions panel.
- Search for Protect My Env.
- Click Install.
From VSIX (manual)
npm install -g @vscode/vsce
vsce package
Then in VS Code: Extensions → ··· → Install from VSIX… and select the generated .vsix file.
Quick Start
- Open any
.env, .env.local, .env.production, or similar file.
- The file opens automatically in Secure .env Mode — values are masked from the first render.
- Use the CodeLens actions above each key:
- Reveal KEY — temporarily show the value
- Hide KEY — mask it again
- Use the toolbar buttons to control all values at once:
- Reveal All Values (
👁)
- Hide All Values (
👁🗨)
Secure .env Mode
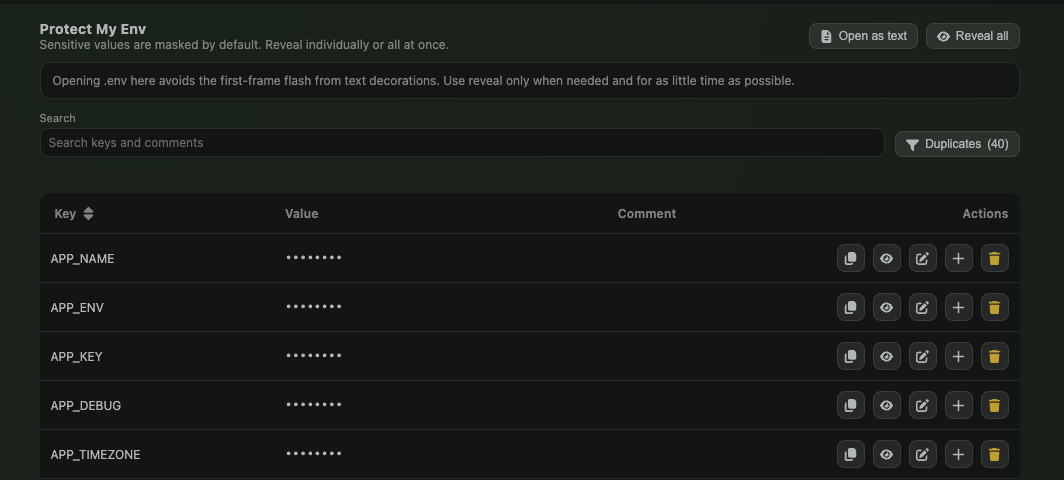
The custom editor opens .env files in a table view where secrets are masked before any rendering occurs — eliminating the "decoration flash" you get with text-editor overlays.
- Search filters keys and comments in real time.
- Click the Key column header to sort the view without altering the file.
- Full-line comments appear as comment rows; inline comments show in a separate column.
- Row action icons let you reveal, edit, add, or delete values (hover for tooltips).
- Click Open as text at any time to switch to the regular VS Code editor.
Configuration
Add any of the following to your settings.json:
{
  "protectMyEnv.obfuscationMode": "all",
  "protectMyEnv.patterns": [
    "*_SECRET",
    "*_KEY",
    "*_PASSWORD",
    "*_TOKEN",
    "PASSWORD",
    "SECRET",
    "TOKEN",
    "KEY"
  ],
  "protectMyEnv.rules": [],
  "protectMyEnv.maskCharacter": "•",
  "protectMyEnv.maskLength": 8,
  "protectMyEnv.protectComments": false
}
Setting Reference
| Setting |
Type |
Default |
Description |
obfuscationMode |
string |
"all" |
"all" masks every key; "pattern" masks only keys matching patterns |
patterns |
string[] |
see above |
Glob patterns applied in pattern mode (case-insensitive) |
rules |
string[] |
[] |
Exact key names that are always masked regardless of mode |
maskCharacter |
string |
"•" |
Character used to render masked values |
maskLength |
number |
8 |
Fixed mask length; set to 0 to match the original value length |
protectComments |
boolean |
false |
When true, masks full-line and inline comments |
Development
Prerequisites
- Node.js ≥ 18
- VS Code ≥ 1.75
Setup
git clone https://github.com/marcuspmd/protect-my-env.git
cd protect-my-env
npm install
npm run compile
Press F5 to launch the Extension Development Host.
Testing
npm test                  # Run all unit tests
npm run test:watch        # Watch mode
npm run test:coverage     # With coverage report
Contributing
Contributions are welcome! Please read CONTRIBUTING.md before opening a pull request.
License
MIT © Marcus Paulo M Dias
Publishing
npm run vscode:prepublish
Scripts
- npm run compile
- npm run esbuild-base
- npm run esbuild
- npm run watch
- npm run vscode:prepublish
- npm test
- npm run test:watch
- npm run test:coverage


 级别条款。您还可以查看
 或
或 级别条款。
级别条款。